Metview’s user interface
Desktop is the user interface of Metview, written entirely in Qt.
At ECMWF the command to start the Metview user interface is as follows:
metview
Users outside ECMWF need to use their local metview command.
The Desktop window
Overview
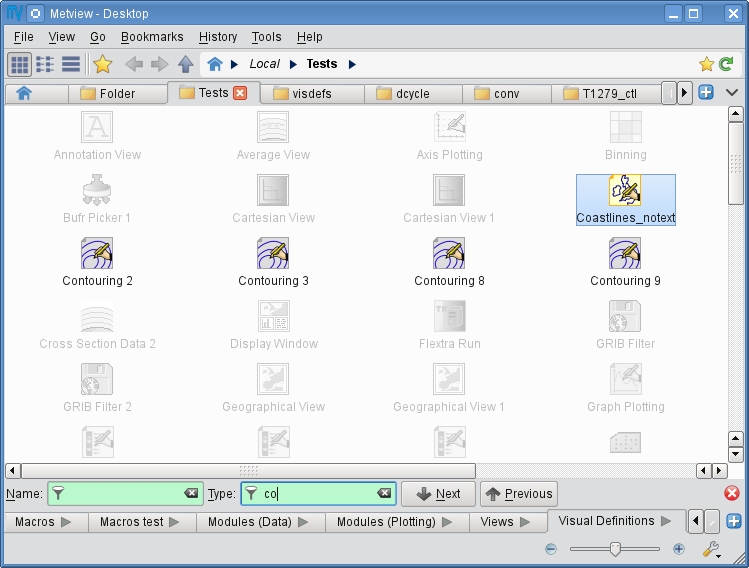
A Desktop window is divided into six parts.
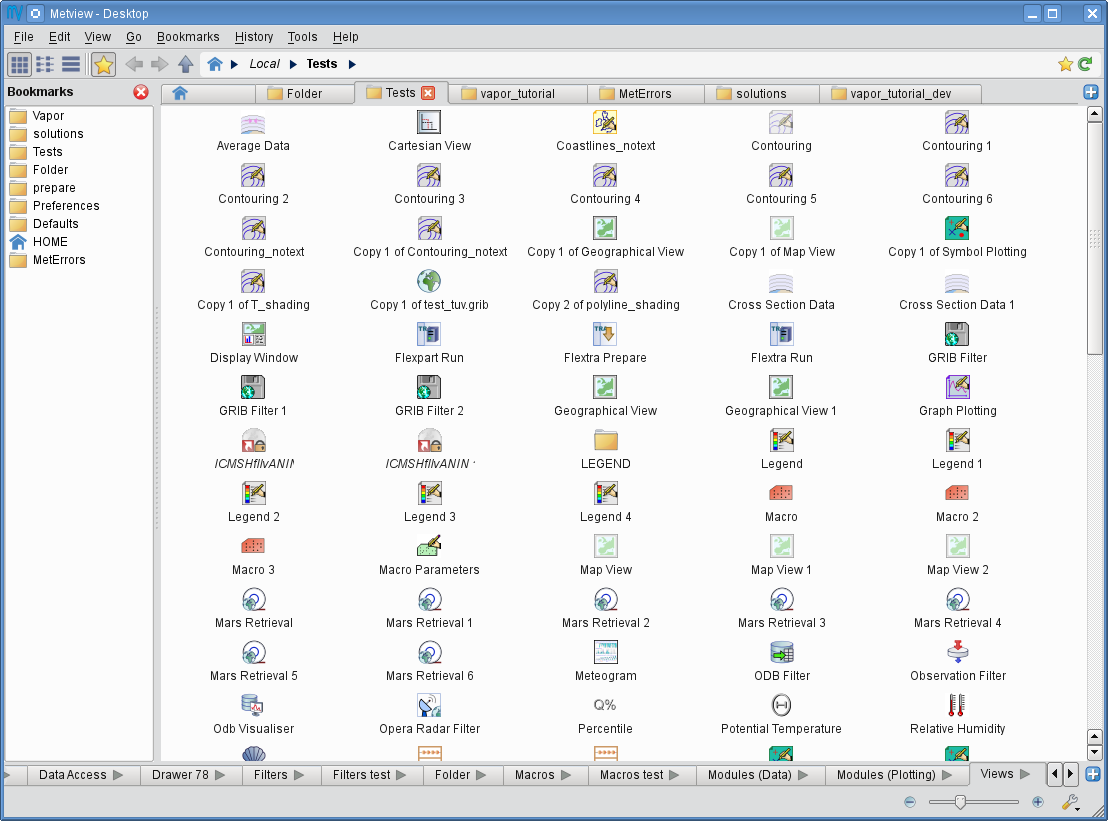
menu bar: contains menus and actions
toolbar: contains a set of buttons/widgets to customise the folder views and navigate through the folders
folder view: contents of the currently selected folder (or folders in different tabs).
sidebar: contains the bookmarks panel
icon drawers: drawers are a set of globally accessible folder tabs. They appear at the bottom of each Desktop window.
status bar: displays information about the icons and provides buttons for changing the icon size
The Metview filesystem
Each Metview session defines a home folder (by default it is ~/metview). This folder is set as both the home and root folder for Desktop! This has two implications. First, the home folder icon
in Desktop always refers to the Metview home folder (and not the UNIX home folder)! Second, we cannot directly access files outside this file system from within Desktop (but we can use symbolic links for these files/folders).
Working with folders
Folders are represented by this icon in the user interface:

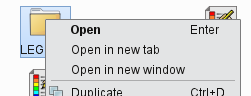
To enter a folder double-click, hit enter or right-click Open on the icon. Folders can also be opened in a new tab or window by using the context menu of the Folder icon.
Folder tabs
The central part of Desktop can contain multiple tabs, each showing a different folder. Folder navigation works for each tab independently.

New tabs can be added by the blue button at the right edge of the tab bar or by using the Ctrl+T keyboard shourtcut.

There is a drop-down menu available at the right edge of the tab bar showing the actual list of open tabs. This menu can significantly ease the tab navigation if there is a large number of tabs open in a given Desktop window.
Tabs are saved
On exiting Metview the list of opened tabs are saved! Tabs can also be saved as bookmarks.
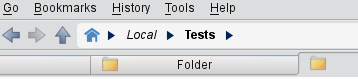
Folder navigation
Folder navigation is based on the Back, Forward and Up arrows and on the breadcrumbs, which are all located in the toolbar. The breadcrumbs consist of the Home icon and the folder hierarchy to the right of it, including the arrows in-between them.
Each visited folder is added to the folder history, which can be accessed via the History menu. Both breadcrumbs and history items have a context menu, which allows opening the folders in a new tab or window.
Folder view properties
View modes
There are three folder view modes available:
Classic icon view: icons are freely movable and icon labels are rendered below the icon pixmaps
Simple icon view: icons are freely movable and icon labels are rendered to the right of the icon pixmaps
Detailed view mode: icons and their properties are displayed in a table format with sortable columns
The view modes can be set for each tab separately through the View menu or by using these toolbar icons:
Changing icon sizes
The status bar features an icon size slider to change the icon sizes in the current folder (sizes between 16 and 96 pixels are available).
The icon size can also be changed from the View menu or from the Desktop context menu.
Folder settings
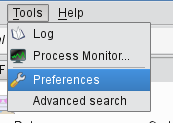
View mode and icon size are stored for each folder separately. When a folder is opened for the first time in Desktop these settings are read directly from existing MetviewUI settings. For newly created/opened folders the default view mode and icon size is used. The default settings can be overwritten via the Tools → Preferences menu:
using the preferences editor:
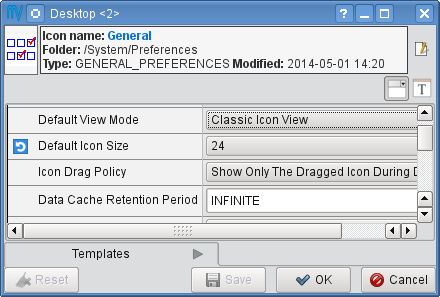
Desktop offers a set of actions to customise the folder settings. These actions are available from the Folder settings tool button (with the “spanner” icon) at the right edge of the status bar (they can also be accessed in the View menu).
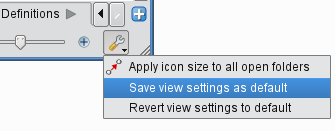
The tasks performed by these actions are as follows:
Apply icon size to all open folders: a one-off action to set the icon size in all the open folders to that of the current folder
Save view settings as default: saves the view mode and icon size of the current folder as the default
Revert view settings to default: changes the view mode and icon size for the current folder back to the default settings
Icon information
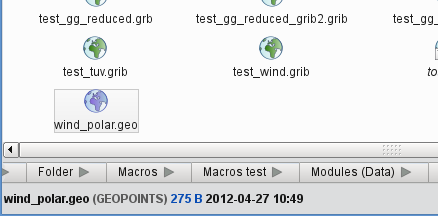
As the mouse hovers over an icon in the folder views certain icon information such as name, type, size and modification date are automatically displayed at left edge of the status bar:
Icon drawers
Icon drawers are a set of tabs containing icon-strips appearing at the bottom of each Desktop window. Their contents are shared among the Desktop windows, so each window shows the same set of drawers.

Users are free to customise both the drawer tabs and the icons they store.
Working with Drawers
Dragging an icon from the icon drawers to the Folder views creates a copy of that icon in the target folder. Similarly, dragging an icon from a Folder view to the Icon drawers adds a copy of this icon to the target drawer.
Users can add new drawers by using the blue Add drawer button at the right edge of the drawers tab. Other drawer related actions can be accessed via the context menu of the drawer tabs.
Please note that icon drawers can be hidden/shown via the View menu.
Creating new icons
The Folder view context menu (right-click anywhere in the view when no icons are selected to see this menu) offer various ways to create new icons in Desktop:
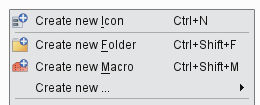
Users can directly create Folder and Macro icons from this context menu. For other icons the Create new icon dialogue should be started up from the context menu (or by using the Ctrl+N shortcut):
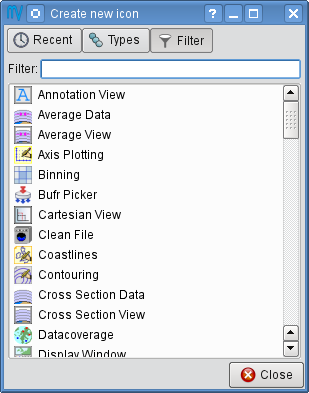
This dialogue features three options to list the available Metview icons:
Recent: contains the list of recently created icons
Types: icons are grouped into categories (e.g. Views)
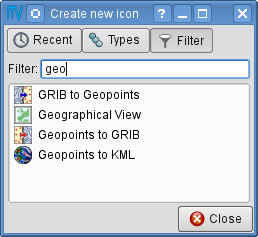
Filter: contains all the available icons with an optional filter working according to the combination of icon name, type and category. For example, typing the filter term “geo” results in the following list:
To create an icon from the dialogue just click on the selected icon or drag it into the Folder view to its desired location.
Creating symbolic links
Symbolic links to files and folders can be created from the Folder view context menu: Create new… Link to File/Folder. In this way, Metview can ‘see’ files which are outside its home folder.
Bookmarks
Both folders and tab-sets can be bookmarked. Bookmarks can be accessed either via the bookmarks menu or the bookmarks sidebar.
Users can open the the bookmarks sidebar
with the Bookmarks button in the toolbar
from the View menu
by pressing Ctrl+B.
Bookmarking a folder
There are various ways to bookmark a folder. It can be done with:
the Bookmarks menu
the context menu of a Folder icon, folder tab or breadcrumbs item.

the context menu of the Bookmarks sidebar
the bookmarks icon at the right hand edge of the breadcrumbs.

Bookmarking tabs
To bookmark a set of folder tabs use either:
the Bookmarks menu or
the context menu in the Bookmarks sidebar
Tab-sets are indicated with a distinct grey icon in the bookmarks list like this (in this case “Demo” is a tab-set bookmark):

Using bookmarks
Bookmark items can be opened in various ways (e.g. in a new tab or in a new window) via their context menu. Opening a tab-set will replace the current tabs in the window.
Icon filtering
Desktop features a filtering facility for finding icons in cluttered desktops. Just press Crtl+F in any of the folder views to bring up the icon filter bar at the bottom of the folder view. By typing in a filter term for name or/and type the icons not matching the filter are greyed out in the Folder view.
Drag and drop
Users can copy icons between Folder views by dragging them with the middle mouse button.
Dragging an icon with the left mouse button means move.
The drop target can also be a Folder icon, a folder tab, a breadcrumbs item, a bookmarks item or an icon drawer. The rules are the same except for icon drawers where both the left and middle mouse button drag actions mean copy!
Desktop actions
The desktop context menu provides a specific set of actions available for the given Folder view.
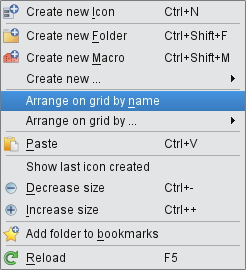
Arranging icons on a grid
For the Classic and Simple view modes the icons can be arranged on a grid sorted by the icon name, type or file size, respectively. This is a one-off action laying out the icons just once, then the icons can be freely moved again.
Icon actions
The icon context menu is icon specific and only shows the actions available for the given icon. The snapshot below shows the context menu for a Grib Filter icon:
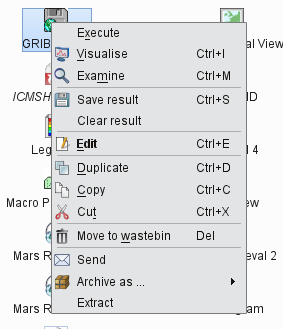
The default action
The Edit action in this example is highlighted in bold because it is the default action for this icon. The default action is triggered by double-click or hitting Enter on the icon. The default action is specific for an icon type (for certain icons it is not defined at all).
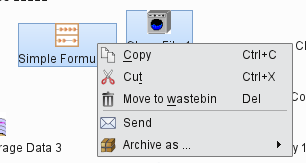
Multiple selection
Desktop provide multiple icon selection by using:
rubberband selection with the mouse
Ctrl selection
For multiple selection the icon context menu shows a specific set of actions only:
Clipboard usage
Desktop uses the system clipboard to implement the Copy, Cut and Paste actions on the current icon selection.
Deleting icons
Unwanted icons can be moved to the wastebin by using the Move to wastebin action (Del shortcut). The wastebin can be emptied in order to permanently delete the icon(s).
Icon output
When there exist output messages for a given icon, it will have a Log action in its context menu, bringing up the log window for that icon. For combined icon output, see Tools.
Archiving/extracting icons
Archiving icons
Icons can be archived into a tar, tar.gz and tar.bz2 format by using the Archive as action in the icon context menu. Archiving is always based on the current selection. The resulting archive file is placed in the current folder and its name is generated from the first icon in the selection.
Extracting icons
For archived formats (e.g. tar.gz) Desktop offers the Extract action in the icon context menu.
Sending icons in email
It is possible to send icons in email from Metview by using the Send action from the icon context menu. When this action is triggered a tar.gz file is generated behind the scenes by resolving all the necessary dependencies (see Archiving icons) and all the needed icon descriptor files are also added to the resulting archive file. Having generated the tar.gz file this dialogue pops up:
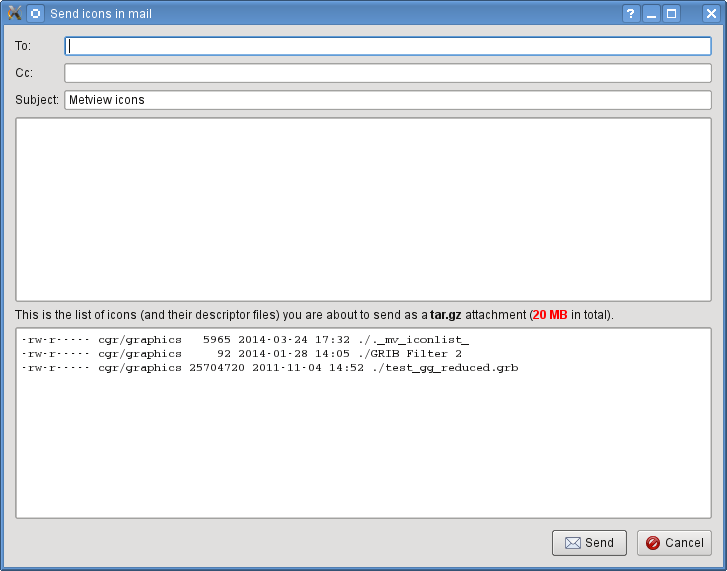
Then users can specify the address, write a custom message and overview the contents of the tar.gz attachment to be sent.
When such email is received it appears in an email client like this:
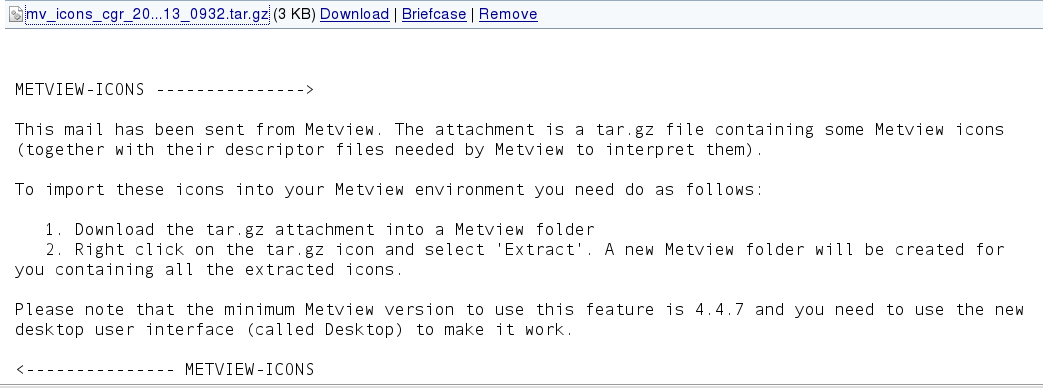
The automatically generated part of the message contains clear instructions on how to import the icons in the tar.gz attachment into the local Metview environment.
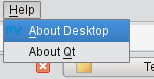
Finding out the Metview version
Desktop displays some information about the Metview version being used in the Help → About Desktop menu:
Icon editors
The editor components
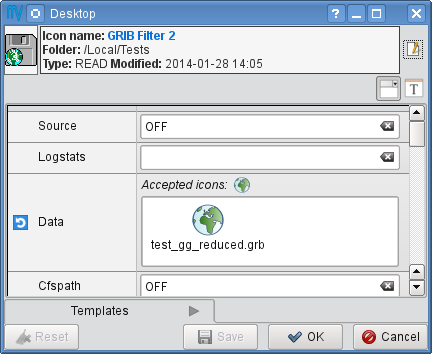
Many of the icon types in Metview are editable. To edit an icon double-click or hit Enter on the icon, or right-click and select Edit from the context menu. This will bring up the icon editor assigned to the given icon type. The basic editor, which is used for the most of the Metview icons, looks like this in Desktop:
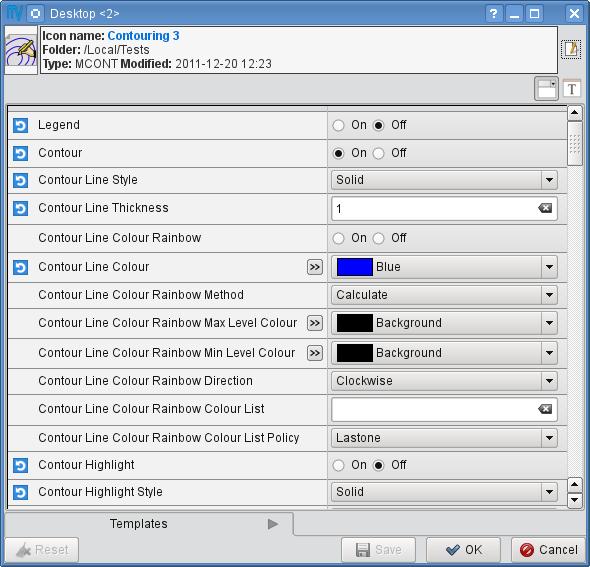
This editor is divided into five main parts:
header: contains information about the icon being edited
toolbar: contains a set of buttons to customise the editor
parameters: each icon parameter can be individually edited here
editor drawers: offers various drawers storing custom icons
button box: contains the buttons to e.g. save, reset the editor.
Toolbar actions
The toolbar features two buttons to switch between GUI and text-based editor modes (the latter is indicated by the ‘T’ icon):

Editors are always opened up in a GUI-based editor mode and to switch into the text-based mode the contents of the editor first have to be saved.
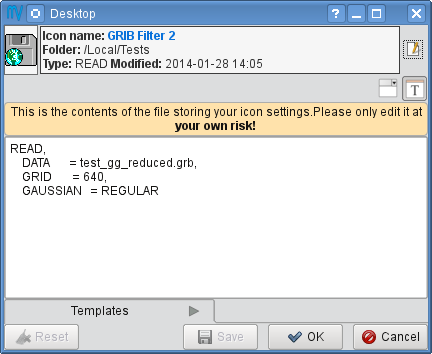
The text-base mode reveals the ‘contents’ of the icon in text format. Here only the parameters which have been changed from their default settings can be seen. This is a quick way to see which parameters have been set in the icon.
Warning
Please try to avoid editing the icon in the text-based editor mode. It is there for development purposes and expert users only.
Icon parameters
Each icon parameter has a default value. When a parameter is set to a non-default value a blue ‘revert’ button appears in front of it to indicate that it has been altered from the default. This button reverts the parameter to its default when clicked.
Some icon parameters have a helper editor offering advanced editing options. If available it is indicated by a ‘double arrow’ helper icon next to the parameter name like this:

By clicking on the helper icon the editor gets expanded and the helper editor becomes available for the given parameter. At the moment these kind of helper editors are available in Metview:
list
colour
colour list
station
Button box
The button box, which is located at the bottom of the editor, offers the following actions:
Ok: save changes and close Save: save changes and stay open (it is also triggered by hitting Enter anywhere in the editor) Cancel: close and do not save changes Reset: reset editor to the last saved state
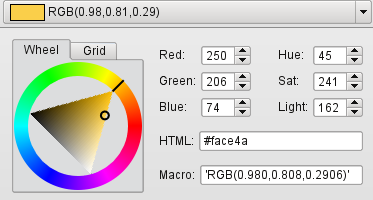
Colour helper editor
The colour helper editor offers a colour wheel and a colour grid (displaying all the predefined/named colours in Metview) for colour selection. The RGB and HSL values, the HTML representation and the Metview macro format of the selected colour are also presented in an editable format.
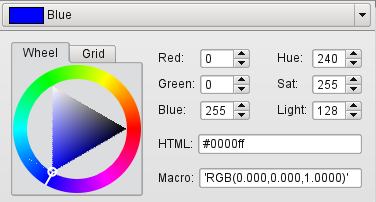
When a new colour is selected in the helper the edited parameter is immediately updated showing the new selection like this:
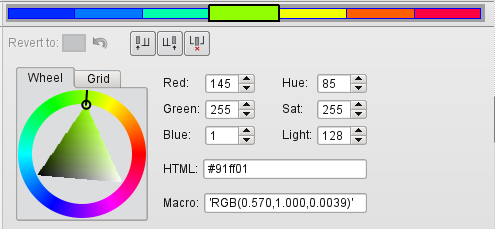
Colour list helper editor
The colour list helper is very similar to the colour helper but allows defining and editing a list of colours instead of having a single colour cell only. By default, the colour list is empty and the editor only displays a single blue cell.
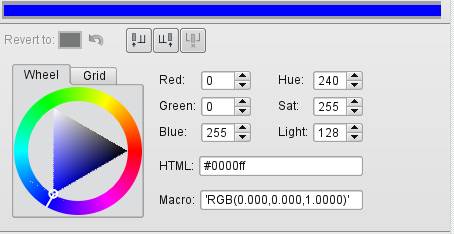
When there are multiple cells in the list the selected cell is indicated by a different frame and cell size.
Cell selection works by simply clicking on a cell. All the actions the colour list editor offers work on the selected cell including:
insert a cell before the selected cell
insert a cell after the selected cell
delete the selected cell
These actions can be triggered either from the buttons

at the top of the helper editor or from the context menus of the cells (right-click on a cell to get the context menu).
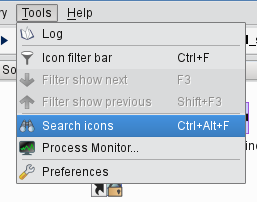
Tools
Icon search
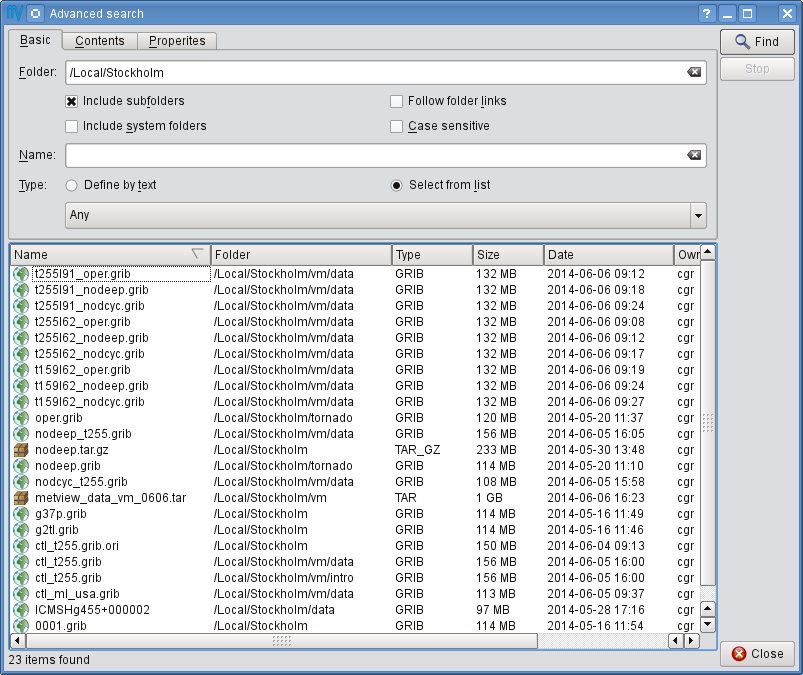
The Search icon dialogue can be started up from the Tools menu on the menu bar.
This dialogue provides an advanced interface to search for icons in the entire Metview folder hierarchy according to name, type, contents and other search criteria. The search options are grouped into these three tabs:
Basic: specifies the folder and the name and type of the icons to be searched for Contents: specifies the containing string to be searched for in ASCII icons Properties: specifies the date, time, size, owner and group of the icons to be found
Once the search criteria are set click on the Find button to start searching. While search is in progress the results are automatically listed and each icon found can be looked up in its own folder view using the Locate in folder view action from the context menu.
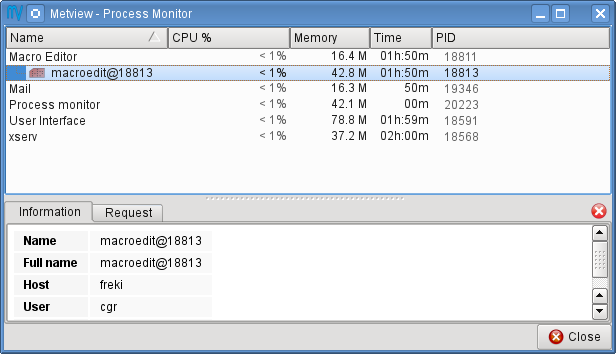
Process monitor
Metview has a built-in task monitor, available from the Tools menu on the menu bar.
This tool allows users to see which processes Metview is currently running. It also allows some control, such as the ability to abort processes (right-click menu on each process’s entry).
Log
Selecting the Log option from the Tools menu brings up the Log window, showing the combined output from all icons in a single place.